Playback problems are a headache for all editors, and there can be many causes of why your video appears to be lagging. Whether you’re stuttering through dropped frames or watching a ‘stop-motion’ version of your project, our 5 fixes can quickly get you back to a smooth editing workflow.
- Learn about the common causes of editing playback issues and how to fix them.
- Discover 5 ways to quickly fix DaVinci Resolve 19 lagging playback.
- Edit with smooth playback using our top tips.
Summary
Common Causes of Editing Playback Issues and how to fix them
Lagging playback can be a problem for all editors, regardless of your software. Whether you’re using Final Cut Pro, Adobe Premiere, or DaVinci Resolve, these common causes of playback issues can help you quickly figure out the problem and how to fix it.
Hardware
Editing video requires loads of processing power, and your device will have several components that must work together to provide a smooth workflow. Adding titles, effects, and grading can increase the strain on your device.
As software constantly updates alongside technology, a common cause of too slow or stuttering playback is simply that the hardware can’t cope with the workload. Each editing program requires different things for optimal workflow, so you should always check that the software specifications match your device.
Too Many Programmes Open
It’s a simple fact that the more programs you have open and running, the slower your computer will operate. When editing your videos, you may need additional software open, such as a stock sound effects library or edit review platform. Always try to limit the number of additional programs you have open while working.
Referencing Different Drives
Many editors work from external drives but often don’t consider that the drive’s speed will also affect their video editing. Selecting a high-speed hard drive is always best when choosing hardware for your projects.
We’re all guilty of occasionally leaving assets in the downloads folder, but referencing multiple drives can also slow down playback. Continually optimize your assets and clips, ensuring your system finds them quickly.
Different Frame Rates
Frame Rates can cause several issues for editors, and playback is at the top of the list. It could be that you’re working with multiple footage sources, which is super common when working with stock footage. Or that your Sequence/Timeline is set to a different frame rate than your footage. It would help if you always matched frame rates across your project, sequence, footage, and outputs.
5 Ways to Fix DaVinci Resolve 19 Playback issues
If you work in DaVinci Resolve, you’ll be happy to hear that the software has several ways to improve your playback quality. You can try them individually or mix different methods to get the best result.
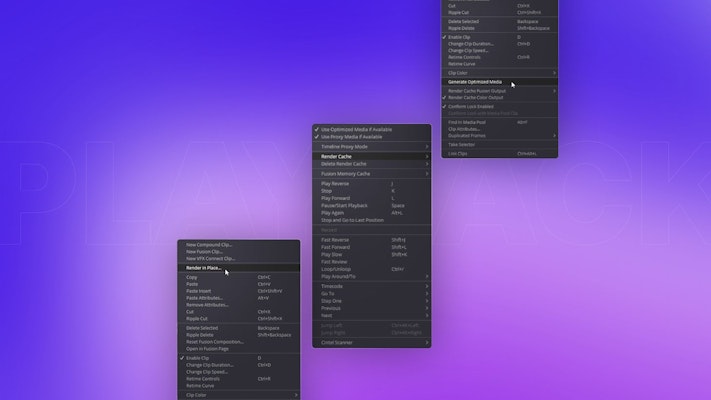
1. Optimized Media
Cameras record in a range of formats, but the compression of H.264 or H.265 files are not really designed for editing. Your computer may struggle with these files, especially in higher resolutions. Even high-end systems eventually reach a limit, so don’t be surprised if your system slows down when presented with a 4K H.265 GoPro file.
DaVinci Resolve’s Optimised Media option provides a built-in solution to help you overcome various recording formats during editing. DaVinci lets you create files in a format better suited to editing, normally Prores 422 on a Mac and DnXHQ on a PC.
The benefit of using optimized media is that DaVinci allows you to switch between the optimized media and the original file when needed. The downside is you can’t share these files with other editors or to another computer.
- Select the clips you want to change to Optimized Media for, then right-click and select Generate Optimized Media.
- Now, DaVinci Resolve will generate Optimized Media for the selected files in the format specified in your project settings.
- To change your Optimized Media’s file type and resolution, go to Project Settings > Master Settings > Optimized Media. Try different settings until you have smooth playback.
- Finally, go to the playback menu and ensure Use Optimised Media if Available is checked.
2. Render Cache
Rendering your project is a fantastic way to ensure the smoothest possible playback. DaVinci has a Smart Render function, instructing the software to identify clips that require rendering and render them in the background.
To set your project to Smart rendering, go to Playback > Render Cache > Smart,
Rendering will only happen when you are not actively editing, so it won’t interfere with your work. Items to be rendered will have a red bar above them in the Timeline, which will turn blue once it is done.
3. Timeline Proxy Mode
A simple and non-destructive method to improve playback performance is to use Timeline Proxy Mode. This mode lets you decrease the resolution of your overall Timeline without affecting the clips.
Go to Playback> Proxy Mode and choose from Half Resolution or Quarter Resolution.
The best thing about the Timeline Proxy Mode is that you can easily switch between resolutions depending on your project requirements, knowing that your Timeline and media are safe.
4. Render in Place
Render in Place is a fantastic option for those troublesome clips with heavy effects or color grading that won’t play smoothly.
- Find the clip you want to render out.
- Right-click on your Clip in the Timeline, then select Render in Place.
- Follow the onscreen prompts to decide the file type, format, and save location.
DaVinci will replace the clip with the rendered version you’ve just saved, complete with all the color grading and effects you’ve added. The Render in Place option can drastically improve playback, as it will be treated like any other raw clip.
The only problem with this method is that to change the clip again, you need to right-click and select Decompose to Original. You’ll then be able to work on the original and render again if needed.
5. Timeline Resolution
When working in resolutions like 4K UHD and higher, dropping your Timeline resolution while editing can be useful to reduce the work your system needs to do to playback your clips, effects, transitions, or titles.
- Go to Project Settings > Timeline Format > Timeline Resolution.
- You can also right-click in your Timeline within the media pool and select Timeline> Timeline Settings.
- Check the box Use Custom Settings before making changes.
- Be aware that if you use the Render Cache option, all your clips will re-render whenever you change your timeline resolution.
- If you intend to output in 4K or above, remember to switch your Timeline resolution back to your target resolution before rendering.
When using the Timeline Resolution option, you can occasionally run into problems with the effects you’ve created in Fusion. If, for example, you edit in HD and export in 4K, some effects created in Fusion may not scale up correctly for the new aspect ratio.
3 Top Tips for Smooth Playback
While there are several ways to troubleshoot your Playback issues, it’s even better not to have them in the first place.
Start in a Lower Resolution
It’s always best to start your project with a lower resolution and then change the Timeline to the final resolution before exporting. Changing back and forth between Timeline Resolutions too frequently can confuse your system.
Don’t touch the Export Resolution
When you need to increase your Timeline Resolution at export, it’s important not to confuse it with your Export Resolution. When you adjust the Timeline Resolution, you’re only changing how the footage looks to you within the edit. The Export Resolution settings will alter the resolution of the exported project.
Don’t Exceed the Resolution of your Original Media
If you’re working on a lower-resolution timeline, it’s essential only to increase the resolution back to that of your original media. If, for example, you increase the Timeline Resolution to 4K while your clips are 1080p, the clip will be stretched to size and poor quality.
Video editing can be tough on your computer, and the more complicated your project is, the more likely you are to run into playback issues. The best way to mitigate any potential lagging is to play your editing, optimize your workflow, and follow our 5 amazing troubleshooting options. If you want more details on rendering in DaVinci Resolve, we have created this handy tutorial.